Navigating the Dashboard
The dashboard system has an ever-growing set of tools and features to help you manage your CASE forms, learning the basic layout will help you when following other How-To articles on our knowledge base.
The Navigation Bar
This Navigation bar is visible at all times when browsing the dashboard, it will stick to the top of your screen when scrolling.
It gives you quick access to the Search Feature (1), Change Log (2), new form button (3) and the personal Menu (4).

The Personal Menu
This is where you can change your password or Log Out from the System, if your account has been confirmed by your branch secretary then you will have the option to view the status of other forms belonging to your branch by clicking "View Other Branch Forms".

Form Categories & Sort by
This section allows you to switch between the different form categories by clicking the headings (1), you can also sort forms by changing the selection in the dropdown box (2).

Form Tools & Controls
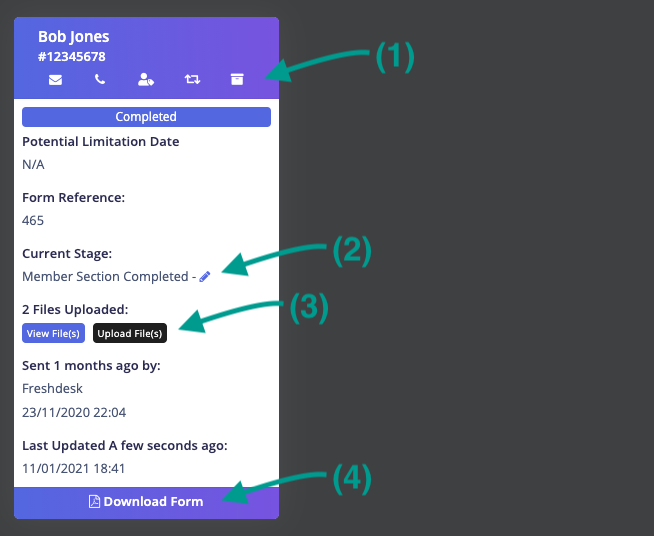
Each Case Form contains a number of tools and depending on its status, some will be visible and others hidden.
There is a Row of Tools (1) displayed underneath the Members name & Membership number, hovering over these icons will display a brief description of what the tool is used for.
When a case is completed it can be reopened using the pencil located at (2)
Uploaded files can be viewed and Uploaded using the buttons at (3)
At the bottom of the form (4) is another button, on completed forms this allows you to download the completed PDF. On forms in progress/not started this will allow you to disable the form.

Support Button
At the bottom of the screen, you will see a Purple Icon, clicking this will connect you to our support team, here you can Report a fault or suggest a new feature.
